紀錄和分享一下練習 Godot4 Shader 做的類 LED 面板效果
先附上 github 連結和效果:https://github.com/shizu0817/-godot-shader-LED-like-effect


製作過程
使用這張圖測試並新增一個 Sprite2D 到場景裡面

然後新增 Shader: 剛新增的 Sprite2D 裡 > CanvasItem > Material >
Material 內選擇 新增ShaderMaterial > Shader 選擇 新增Shader

進入到 shader 編輯器後
首先為了要做出很多小 LED
我們先從繪製出一個圓形開始


平滑一下邊緣、反轉黑白


畫出一個圓形後
接著複製出這些圓形,製作出類似 LED 面板的樣子
參數 uv_scale 可以調整在水平跟垂直方向複製的個數
使用 fract ( UV * uv_scale ) 做出重複這個圓形的效果


調整一下重複的數量


有了面板的樣子後
就要來在 shader 內讀取圖片 texture 讓圖片顯示在 LED 上了
我想要的是在白色圓形內顯示圖片顏色,圓形外面顯示黑色
所以我使用 mix() function 做內插來達到這個效果


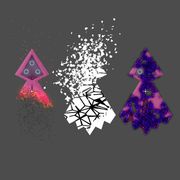
這樣做了以後,可以發現有幾個問題
1. 圖片是透明的地方,經過 shader 處理後也會是透明的 (上圖能看到後面的 godot icon)
2. 每個 LED 內不是只顯示一個顏色
我對第 1. 點的處理方法是設定一個參數可以調整 LED 不發光時的顏色
所有輸出的 RGBA 值都一定要大於等於這個設定值
所以如果參數設定 alpha = 255 (1.0),就不會顯示透明的顏色了


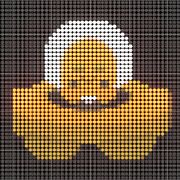
參數調整至 #323232, alpha = 255
在第 2. 點,如果要讓一個 LED 內都顯示同一個顏色
就要讓一個 LED 裡面每一個 pixel 採樣的 texture 顏色相同
也就是一個 LED 裡面每一個 pixel 用來採樣 texture 的 uv 值必須一樣
直接上圖解釋過程


到這裡可以說是大功告成啦~~
利用這樣就可以做出其他很多的效果了
捲動的效果

可以編輯圖片留下一些空白的捲動空間

要調整節點的 Repeat 屬性

在採樣 texture 的 x 方向加上時間,產生橫向捲動效果

Glow 輝光效果
注意:Godot4.1 無法使用,製作時是使用 Godot 4.2-dev5。(Godot 3.x 未測試)
設置:
1. 進入 Project Settings > Rendering > Viewport > HDR 2D 勾選開啟。(要重開 Godot)

2. 在場景中加入 WorldEnvironment 節點後,設定如下

3. 我的作法是讓原本 LED 的 RGB 值,高於參數 glow_above 的時後,
讓超過的 RGB 值平滑的增加(要加超過 1.0)。
參數 glow_strength 可以調整增加的最大值。


使用灰階材質圖做出一些特效


使用單張圖片
使用 spritesheet ( 較複雜 )
總結 & 參考資料
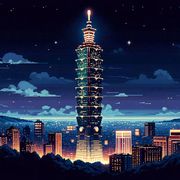
這個類 LED 的 shader 是看到 https://www.artstation.com/artwork/2xyxzK 後
想說練習做做看類似的效果,以上就是我練習過程中的想法
如果有興趣或任何問題,歡迎留言一起討論~~
參考資料:
- 靈感來源-https://www.artstation.com/artwork/2xyxzK
- 素材來源-https://www.kenney.nl/ & https://www.kenney.nl/assets/alien-ufo-pack
- GLOW-https://github.com/godotengine/godot/pull/80215
- Godot 4.2 dev5-https://github.com/godotengine/godot-builds/releases/tag/4.2-dev5
我的連結:
- twitter:https://twitter.com/Czu000
- itch.io:https://czu7985.itch.io/