買了humble 正在超特價unity的套件組合。主要是為了這個Storyteller。看上他有多國語言在地化功能。可省下一整年自己寫對話系統的時間。先研究如何使用再說。畢竟我程式並不強 orz 自己做遊戲還是偏美工製作的部份比較好。
研究了二天不會用
目前只打的出 hello world 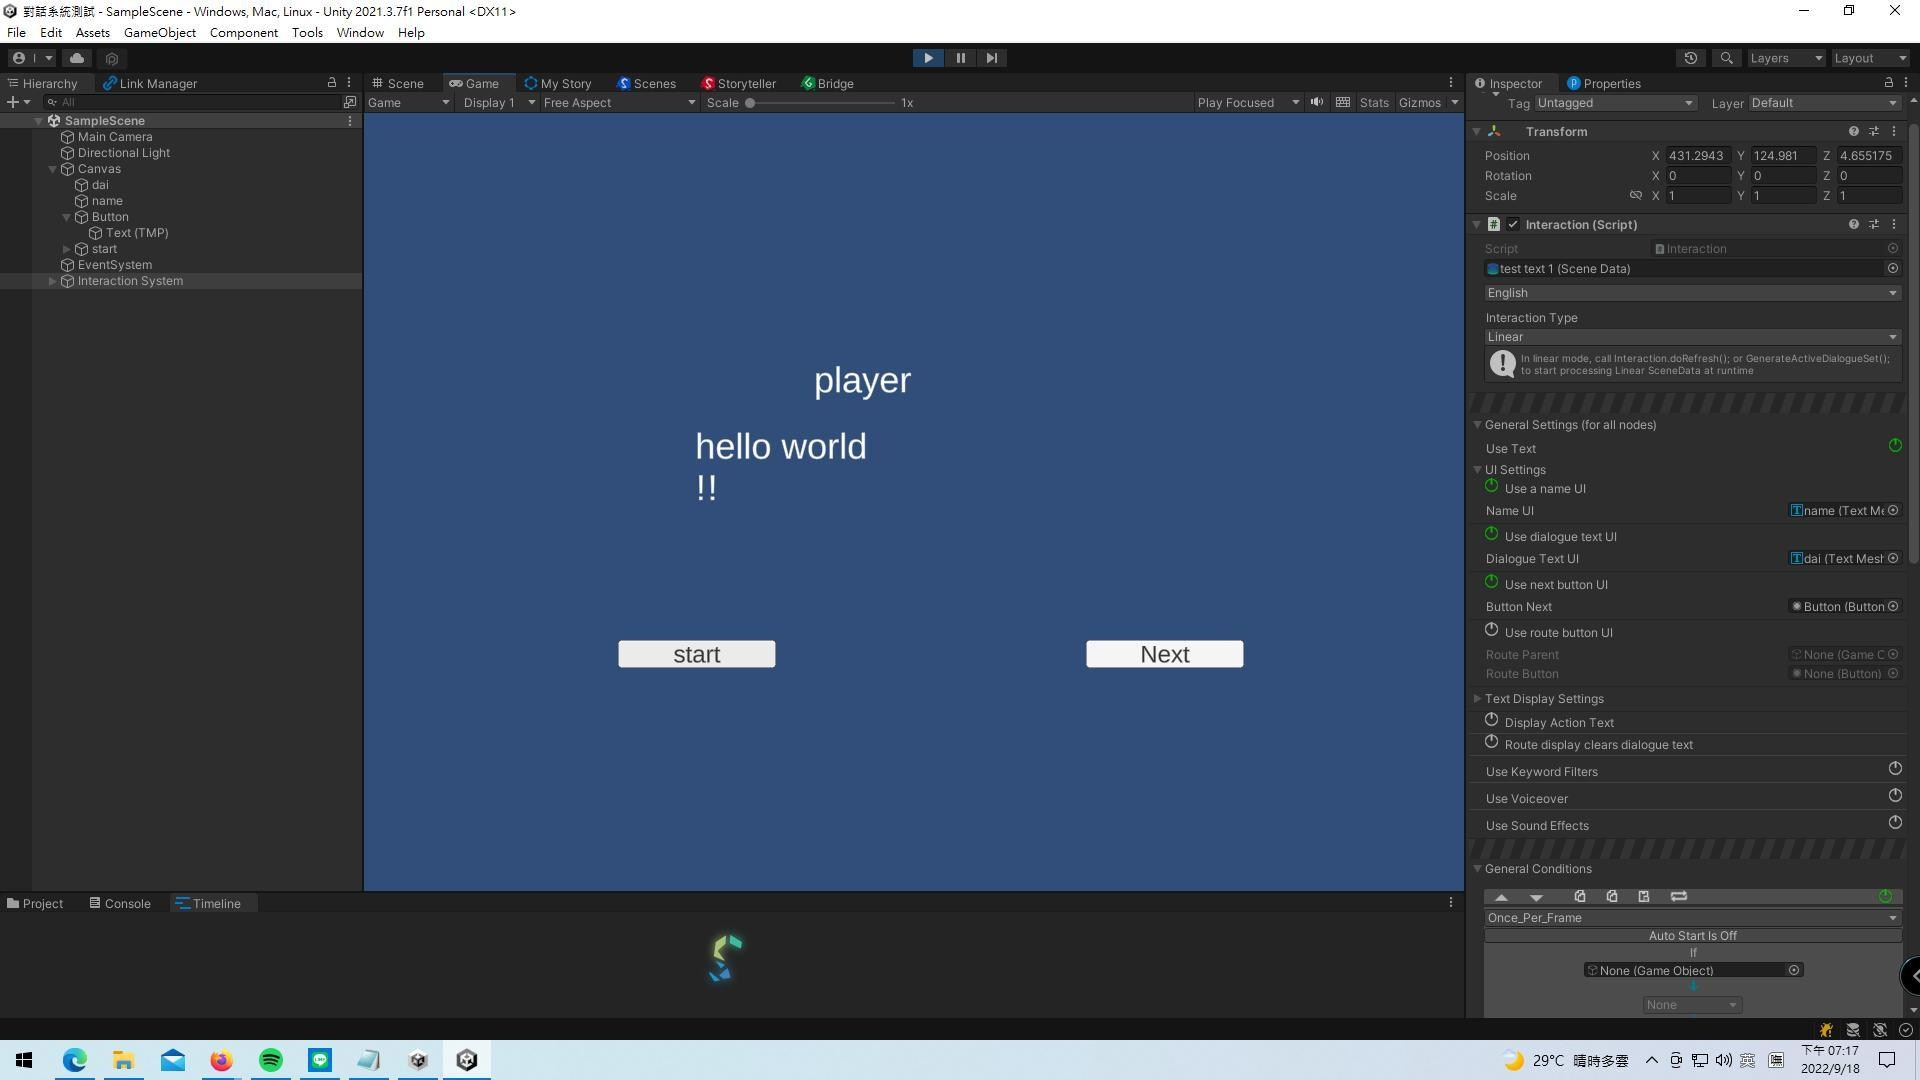
=====
Game Bridge:
Using Your Story in Game Gamebridge is the Production component of Storyteller and allows you to take the things you make in Storyteller and use them in game via GameBridge
遊戲橋接:
在遊戲中使用你的故事。Gamebridge 是 Storyteller 的製作組件,可讓您拿走自己製作的東西在 Storyteller 中並通過 GameBridge 在遊戲中使用它們
All the information on the following pages will walk you through getting started with using your
storyteller data ingame, using Game Bridge , Dialogue component and Character component.
以下頁面上的所有資訊將引導您開始使用您的遊戲中的故事講述者數據
使用 Game Bridge 、 Dialogue 組件和 Character 組件。
Pushing your story to game bridge
Gamebridge is the Production component of Storyteller and allows you to take the things you make
in Storyteller and use them in game via GameBridge
Gamebridge is the Production component of Storyteller and allows you to take the things you make
in Storyteller and use them in game via GameBridge
將您的故事推送向遊戲橋接。Gamebridge 是 Storyteller 的組件,可讓您取得於Storyteller製作的內容 ,並通過遊戲橋接 在遊戲中使用它們。
To launch the Game Bridge Window. Open the Context Menu in Storyteller by clicking the canvas and
go to Windows > GameBridge.
go to Windows > GameBridge.
啟動遊戲橋接窗口。 通過右鍵單擊畫布打開 Storyteller 中的上下文菜單,然後轉到 Windows > GameBridge。
Now you want somewhere to actually put your storyteller data so that it can be used in game as a
standalone dataset. We will create a Scene Data Asset. Right click inside the project window and go to
Create > Game Bridge > SceneData. Name it whatever you want to name it
standalone dataset. We will create a Scene Data Asset. Right click inside the project window and go to
Create > Game Bridge > SceneData. Name it whatever you want to name it
現在你想在某個地方實際放置你的故事講述者數據,以便它可以在遊戲中用作獨立數據集。 我們將創建一個場景數據資產(storytellers組件)。 在項目窗口內右鍵單擊並轉到創建 > 遊戲橋 > 場景數據。 給它起任何你想命名的名字
補充說明 在 Projcet 裡點選Assets 然後右鍵 >>
With you SceneData asset selected, go to the GameBridge windiw and you will see all the avalible
scenes in your tory listed. Click on the Scene which you wish to have pushed to the SceneData asset.
scenes in your tory listed. Click on the Scene which you wish to have pushed to the SceneData asset.
選擇 SceneData 資產後,轉到 GameBridge 窗口,您將看到所有可用的您的故事中列出的場景。 單擊您希望推送到 SceneData 資產的場景。
Once you have selected the scene you want, you will see a list of all the characters that exist in the
scene and options for what type of content to push over into the SceneData. Pushing personality
traits is turned off by default. Sound effects , voice clips and all characters are set to be pushed by
default. Once you have made your selection. Press the “Push To Scene Data” button
If you update your story you just click the push button and your new data will update the SceneData
一旦你選擇了你想要的場景,你會看到一個列表中存在的所有角色場景以及將什麼類型的內容推送到 SceneData 的選項。 推個性特徵默認關閉。 音效、語音片段和所有角色都設置為推送默認。 一旦你做出了選擇。 按“推送到場景數據”按鈕如果您更新您的故事,您只需單擊按鈕,您的新數據將更新 SceneData
You will then need to create a new gameObject I the unity scene and attach a Interaction Component to it
wither by selecting it from the Game Bridge window or by adding it from the Add Components option I the
inspector.
一旦你選擇了你想要的場景,你會看到一個列表中存在的所有角色
場景以及將什麼類型的內容推送到 SceneData 的選項。 推個性
特徵默認關閉。 音效、語音片段和所有角色都設置為推送
默認。 一旦你做出了選擇。 按“推送到場景數據”按鈕
如果您更新您的故事,您只需單擊按鈕,您的新數據將更新 SceneData
Then assign your scene data to the interaction component
然後將您的場景數據分配給交互組件
All the data will be setup for you, and you are now ready to move to the next steps .
Now you select the type of interaction. Linear or Non-Linear
Linear interactions happen between characters in a predetermined way . Example. Visual novel
interactions.
Nom-Linear is used when there is no set interaction order between characters. Like when interacting
with NPC or in cutscenes.
將為您設置所有數據,您現在可以進行下一步了。
現在您選擇交互類型。 線性或非線性
角色之間以預定的方式發生線性交互。 例子。 視覺小說
互動。
當字符之間沒有設置交互順序時使用 Nom-Linear。 喜歡互動的時候
與 NPC 或過場動畫。
Now that you know how to push storyteller data into a SceneData asset and assign it to an Interaction
component. The first thing that you need to do is to create any UI you want,you must Use TextMesh
Pro.
You also do not need to use any UI if your game doesn’t require it.
We will proceed assumingthat you are using UI. We will be looking at the Dating Sim scene as our first
reference.
Select the gameobject that has the Interaction component attached to it and look at the
inspector. Make sure thatyour Storyteller canvas is also in view.
現在您已經知道如何將故事講述者數據推送到 SceneData 資產並將其分配給交互
零件。 你需要做的第一件事是創建任何你想要的 UI,你必須使用 TextMesh
臨。
如果您的遊戲不需要,您也不需要使用任何 UI。
我們將繼續假設您正在使用 UI。 我們將把約會模擬場景作為我們的第一個
參考。
選擇附加了交互組件的遊戲對象並查看
檢查員。 確保您的 Storyteller 畫布也在視圖中。
If you are not in the Dating Sim scene. Righr click on the canvas and go to File> Exit.
如果您不在約會模擬場景中。 右鍵單擊畫布並轉到文件> Exit
Then double click on Dating Sim project to pen it
然後雙擊 Dating Sim 項目將其畫筆。
You can now assign your UI , you can choose to disabe use of any UI component pr pression the
powerbutton. You can use UI fpr Name and dialogue display, forward button and route buttons. You
must assign aUI prefab button to the Use route button area. The “Route Parent” object area is for the
gameobject which will be the parent of the route buttons which are instanced in a grid form. (please
look at the example scene to see the setup in detail)
您現在可以分配您的 UI,您可以選擇禁止使用任何 UI 組件prpression
電源按鈕。 您可以使用 UI fpr 名稱和對話顯示、前進按鈕和路由按鈕。 你
必須將一個 UI 預製按鈕分配給使用路由按鈕區域。 “Route Parent”對象區域用於
遊戲對象,它將成為以網格形式實例化的路由按鈕的父級。 (請
查看示例場景以詳細查看設置)
If there is a UI type that you do not need to use then you can click the green power button to turn any
UI off.
如果有不需要使用的 UI 類型,則可以單擊綠色電源按鈕打開任何
用戶界面關閉。
In the Text Display Mode settings , you can choose to have your text be typed out at a specific rate or
instantly displayed.
在文本顯示模式設置中,您可以選擇以特定速率輸入文本或
瞬間展現出來。
It will be helpful to you to scroll to the bottom of the inspector and turn on “Show Help Messages”
滾動到檢查器底部並打開“顯示幫助消息”將對您有所幫助
Keyword Filters allow you to change text in dialogue at runtime, allowing you to replace :
static keyword with dynamicreplacement
static keyword with static keyword
dynamic keyword with static keyword
dynamic keyword with dynamickeyword
Your keyword filters can of course use htmlmarkup <b> <color=> etc
關鍵字過濾器允許您在運行時更改對話中的文本,允許您替換:
帶動態替換的靜態關鍵字
靜態關鍵字與靜態關鍵字
動態關鍵字與靜態關鍵字
動態關鍵字與動態關鍵字
您的關鍵字過濾器當然可以使用 html標記 <b> <color=> 等等
Under the Keyword filters settings you will see option for Using voiceover and using sound effects.
You can turn them on to work generally across all nodes in game or turn them off and have specific
nodes play audio.
Both can be set to automatically start, this is best left tuned on if you are not playing trough events in
succession
在關鍵字過濾器設置下,您將看到使用畫外音和使用音效的選項。
您可以將它們打開以在遊戲中的所有節點上普遍工作,或者將它們關閉並具有特定的
節點播放音頻。
兩者都可以設置為自動啟動,如果您沒有在演替。
Depending on the type of node that you select, the data you see in the inspector will change. This
part of the workflow is partially visual scripting to allow for you to give every node its own function in
game. The data you edit in the inspector does not change your Story data, only your SceneData is
changed.
The next step is to identify which character in your story is your player, select your player in your
storyteller canvas and scroll down in the inspector and click the “Is Not Player, Turn On Player”
button. You should only have one player.
根據您選擇的節點類型,您在檢查器中看到的數據會發生變化。 這個
工作流程的一部分是部分可視化腳本,允許您為每個節點賦予其自己的功能
遊戲。 您在檢查器中編輯的數據不會更改您的 Story 數據,只有您的 SceneData 是
改變了。
下一步是確定你故事中的哪個角色是你的玩家,選擇你的玩家
講故事的畫布並在檢查器中向下滾動,然後單擊“不是播放器,打開播放器”
按鈕。 你應該只有一名玩家。
In this example the language is set to Japanese. To toggle between languages right click o the canvas
and go to Windows> languages and then select the language you want to have displayed.
在此示例中,語言設置為日語。 要在語言之間切換,請右鍵單擊畫布
並轉到 Windows> 語言,然後選擇要顯示的語言。
Depending on the type of node that you select, the data you see in the inspector will change. This
part of the workflow is partially visual scripting to allow for you to give every node its own function in
game. The data you edit in the inspector does not change your Story data, only your SceneData is
changed.
根據您選擇的節點類型,您在檢查器中看到的數據會發生變化。 這個
工作流程的一部分是部分可視化腳本,允許您為每個節點賦予其自己的功能
遊戲。 您在檢查器中編輯的數據不會更改您的 Story 數據,只有您的 SceneData 是
改變了。
When you select a Dialogue node you will see that you have the option of turning on the Markup Edit
and accessing the Markup Editor. So <b>you</b> <color = red>can</color><i> do things </i> <size =
20>like this</size>.
You can do things like this
當您選擇對話節點時,您將看到您可以選擇打開標記編輯
並訪問標記編輯器。 所以<b>你</b> <color = red>可以</color><i>做事</i> <size =
20>像這樣</size>。
你可以做這樣的事情
If your node has a voice clip or a sound effect then you will see them displayed in the voice clip and
sound effect section.
Currently the only overrides for the voice and sound effect are to not use the audio , however you can
still replace the audio clips and as usual the data in the actual node in the storyteller canvas will not be
lost.
如果您的節點有語音剪輯或聲音效果,那麼您將看到它們顯示在語音剪輯中,並且
音效部分。
目前,語音和音效的唯一替代是不使用音頻,但是您可以
仍然替換音頻剪輯,並且像往常一樣,講故事者畫布中實際節點中的數據將不會
丟失的。
You will see the Start time, Duration and Delay times of the selected node. Realtime delay is
generated at runtime and the time between the current event and a future event. It is the
recommended time value that you use in Conditions, which are explained next.
您將看到所選節點的開始時間、持續時間和延遲時間。 實時延遲是
在運行時以及當前事件和未來事件之間的時間生成。 它是
您在條件中使用的推薦時間值,下面將對此進行說明。
Conditions are the most important functions when working with the Interaction component.
They are able to trigger any function and are responsible for the triggering and processing of
many internal events necessary for interactions in game. Conditions can be made to handle
complex conditions by adding new if statements to a condition se
條件是使用交互組件時最重要的功能。
他們能夠觸發任何功能,並負責觸發和處理
遊戲中交互所必需的許多內部事件。 有條件可以辦理
通過向條件 se 添加新的 if 語句來複雜條件
The execution order of conditions are from first to last.
You can set a condition to Automatically start orstart based on time. The time you use depends of
what you wish to achieve
You can use conditions to turn on other conditions, or stop conditions that are already running
40
You can add and remove a condition by clicking the + or –button.
When you add a condition , it is placed directly under condition whose + button you clicked
Each condition can use any amount of UnityEvents, these unity events can can be triggered through a
variety of ways.
You can move conditions up are down by clicking the up and downarrow
條件的執行順序是從頭到尾。
您可以將條件設置為自動啟動或基於時間啟動。 您使用的時間取決於
你想達到什麼
您可以使用條件來打開其他條件,或停止已經運行的條件
40
您可以通過單擊 + 或 – 按鈕添加和刪除條件。
當你添加一個條件時,它直接放在你點擊了+按鈕的條件下。
每個條件可以使用任意數量的 UnityEvents,這些統一事件可以通過一個
多種方式。
您可以通過單擊向上和向下箭頭將條件向上移動
When we select a route node, we will see an option in the inspector for using Alternate Route Titles.
Route Titles are just the names that will be displayed as choices that your character will make if you
choose to use UI and display options.
當我們選擇一個路由節點時,我們將在檢查器中看到一個使用備用路由標題的選項。
路線標題只是將顯示為您的角色將做出的選擇的名稱,如果您
選擇使用 UI 和顯示選項。
You can now run the example scene or continue exploring settings. This covers the use of the
Interaction component in Linear mode
您現在可以運行示例場景或繼續探索設置。 這涵蓋了使用
線性模式下的交互組件
Open the NPC Quest Story
打開 NPC 任務故事
In this scene the interaction component is setup the exact same way. Except it set to Non-linear mode.
There are also 5 NPC characters in the scene, so we add a Interactable Character component to each of them.
在這個場景中,交互組件的設置方式完全相同。 除了設置為非線性模式。
場景中還有 5 個 NPC 角色,因此我們為每個角色添加了一個 Interactable Character 組件。
The character that you wish to be made into your main character (Player) you add the Collision Interaction Trigger component to IF you are interacting with NPC’s via collision trigger.
On your NPC collider gameobject you must then add a Collision Interaction Receiver.
You will then input the name of the tag on your NPCs collider.
如果您通過碰撞觸發器與 NPC 進行交互,則您希望成為主角(玩家)的角色添加碰撞交互觸發器(Interaction Trigger)組件。
在您的 NPC 對撞機遊戲對像上,您必須添加一個 Collision Interaction Receiver組件
然後,您將在 NPC 對撞機上輸入標籤的名稱
Looking at the Player character in the story, and generally based on you designing your story/dialogue
you know who is your main character and how your story flows. In the case of the NPCQuest story.
We see that we have a Route node named Path Check and then four other nodes attached to it.All leading todialogue with other characters
查看故事中的玩家角色,通常基於您設計故事/對話。
你知道誰是你的主角以及你的故事是如何發展的。 在 NPCQuest 故事的情況下。
我們看到我們有一個名為 Path Check 的 Route 節點,然後附加了四個其他節點。所有這些都導致與其他字符的對話
Since you now understand how conditions work and how route nodes are used, you will understand the next steps we will take.
The “ Path Check” route will be setup so that whichever character (NPC) we choose to speak to, acondition will trigger a conversation with thatNPC.
As you notice, Path check is linked to NPC1, NPC2 , NPC3, and NPC5 dialogue but is not linked to
NPC4 dialogue. This is because NPC4 is a background character in this scene, designed to show that
you can speak to any character even if you do not plan any dialogue with that character and also that
NPC4 is able to jump into a conversation at any point , kind of the way a real person would in real life.
由於您現在了解條件如何工作以及如何使用路由節點,因此您將了解我們將採取的後續步驟。
將設置“路徑檢查”路線,以便我們選擇與哪個角色(NPC)交談,一個條件將觸發與該NPC的對話。
如您所見,路徑檢查與 NPC1、NPC2、NPC3 和 NPC5 對話相關聯,但未與
NPC4 對話。 這是因為 NPC4 是這個場景中的背景角色,旨在顯示
即使您不計劃與該角色進行任何對話,您也可以與任何角色交談
NPC4 可以隨時進入對話,就像現實生活中的真人一樣。
All the nodes that the “ Path Check” route correspond to a Route value
“Path Check”路由對應一個Route值的所有節點
Set the “Route Number” of each character component to match the route value which the NPC dialogue data is on.
The player and NPC4 are not on any route so their Route Number must remain as 0.Set the main language for each and then press the setup button on each character component.
設置每個角色組件的“路線編號”以匹配NPC對話數據所在的路線值。
玩家和NPC4不在任何路線上,因此他們的路線編號必須保持為0。為每個人設置主要語言,然後按每個角色組件上的設置按鈕.
Route0
Route1
Route2
Route3
This final step concludes the process for this scene.
The Path check route node is going to use conditions to determine which NPCtobegin a conversation with. You may observe the condition setting in theinspector.
How this condition works is that if the player walks into the NPCtrigger area the condition will set the UI to active and then the condition will tell the Path Check Route node to go to the route to execute a internal function named ContinueOnRoute. Soif you walk into the NPCtrigger on a character with a route value of 2 then ContinueOnRoute will put generate the dialogue for the player and NPC2.
This concludes the walkthrough of using the Dialoguer component and the Character component
路線0
路線1
路線2
路線3
最後一步結束了這個場景的過程。
路徑檢查路由節點將使用條件來確定與哪個 NPC 開始對話。 您可以觀察檢查器中的條件設置。
這個條件的工作原理是,如果玩家走進 NPCtrigger 區域,該條件會將 UI 設置為活動狀態,然後該條件將告訴 Path Check Route 節點轉到該路線以執行名為 ContinueOnRoute 的內部函數。 因此,如果您在路線值為 2 的角色上進入 NPCtrigger,則 ContinueOnRoute 將為玩家和 NPC2 生成對話。
到此結束使用Dialoguer組件和Character組件的演練